Navigation Bar

Mrs. Baker's Dozen Image Map


Tuesday, August 25, 2015

Building Back To School: Reading Tools!

Happy back to school, everyone!  I am kicking back right now, enjoying some 'chair' time.  Is it just me or is SITTING DOWN just not happening in the first few days of school???  Actually, it's like that  for most of the year....BUT especially bad at the beginning! 


I'm so excited to join my sweet friend Denise for Building Back To School!  Congrats to her family on welcoming a beautiful baby girl this week!  


I love creating Close Reading units in my spare time and testing them out in my classroom.  Here's a few tips from my Complete Core units that contain lesson plans and resources for a weeklong close reading unit.


1. Share reading editing strategies.  I use: Circle words you don't know, highlight important information, and underline key words.

2. Discuss the topic before hand to gather what we know.  I feel like this warms up the students before their first cold read.

3. Although my close reading units are informational text, I always include a fun fictional mini book.  Balance is good :)


I'm giving away a copy of your choice of my Complete Core units! Here are a few I've creating recently.


Leave a comment below with your email and I will chose a winner later this week!  If you'd like to take a closer look at the units, just click on the pictures and it will take you to my TPT store.  


Enjoy your week!!

Monday, August 10, 2015

Monday Made It: Anchor Chart Display


I'm shedding a few tears for this last Monday Made It, sniff sniff.  It was a fun and crafty summer, but it's time to get down to first grade business! ;)


Sorry for the dark picture! :)  I borrowed this idea from 3rd Grade Gridiron.  I had this huge bulletin board that I knew I couldn't put just anything on.  I needed something that was worthy! ;)

I hot glued some clothespins (I put washi tape on top of them) on to the bulletin board to hold the anchor charts.  To figure out the spacing, I used pushpins first.

It really was easy peasy!  Last year I would shove my anchor charts behind my Smartboard when I was done with them.  I love how I can display the info we gathered as a class and are able to look back and review, too!


My latest TPT product!  I am trying to create some shorter, easier packs that don't require lots of instructions.  I needed something for my early finishers tub, and this is perfect!


No prep cut and paste!  Works on motor skills, plus an academic skill!  Make individual copies of the main sheet (with the picture) and cut the answer sheets in half to save on paper.  Here's another example:


And they are all Fall inspired!  Catch this fun pack at a great price HERE.


Check out the other great Monday Made It posts at 4th Grade Frolics!


Sunday, August 9, 2015

Building Back To School: Classroom Tools


It's Back To School, baby!  I am so excited to be joining my sweet friend, Denise from Hashtag TeacherMom, today for her BTS linky.  This week we are focusing on Classroom Tools!


I adore Pinterest...I mean ADORE.  Pinterest is kinda like my hot husband, in the form of recipes, crafts, and teaching tips.  :)

Here's some Classroom Tools I would LOVE to have!


1. Class Dojo for Classroom Management


Last year was my first year using Class Dojo.  It took me a week to get the groove, but after that, I threw away my clip chart and never looked back!  The best part about Class Dojo is that parents can get notifications on their phones about their child's behavior.  I also love the nice pie chart I can create to show behaviors at the end of the 9 week period. :) Very organized!


2. The Daily 5


This is my third year using Daily 5 in my classroom.  Just like Class Dojo, it took me awhile to get my routine, but it pays off!  I love how the students practice each day and build their stamina!  It's just an awesome strategy to teach kids at a young age.  My kiddos last year were so competitive with themselves, our stamina shot through the roof for read to someone!!


3.  Editable Homework Newsletter


This is my own product and I cannot wait to use it!  Last year I spent hours typing up spelling lists and fluency stories on Friday afternoons, barely making copies before the end of school.  

Now all I have to do is type in my weekly info, save, and copy!  I will be copying on both sides of one paper and to make it easier for parents to see, I will use colored paper.  

There are spaces for vocabulary, spelling, and sight words, plus a spelling menu!  Ideas for the spelling menu would be rainbow writing, play doh words, 3x each, or scribble spelling.  Finally, on the back is a place for your weekly fluency story.  Can't wait to use this!

Want to win one for your classroom?  Enter the rafflecopter below and if I draw your name, you can pick the grade!  I currently have K-2, but am working on 3rd, too!

Follow me on Pinterest for more BTS glorious ideas! ;)

Be sure to check out more great Classroom Tools from my friends!


a Rafflecopter giveaway

Friday, July 31, 2015

Big Heartland Blogger Giveaway + $1 Deals!


It's back to school for a lot of us and our new bloggy group, Big Heartland Bloggers, are here to make it easier on YOU!  Through Sunday, you can enter our Rafflecopters for a chance to win awesome back to school products!  Wait, it doesn't stop there...We are also doing $1 deals on Saturday, August 1st!  For a buck, you can find some fantastic resources to start your year off right.  

Writing can be hard, I mean really HARD for students of all ages.  Read on for tips on how I organize Writer's Workshop in my first grade room and enter for a chance to win my pack, Little Writers!: Writer's Workshop for grades K-2.


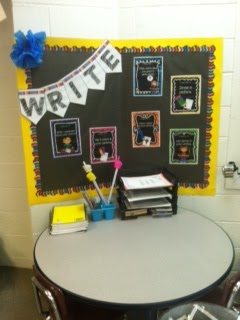
Here is my writing corner, and I really mean corner!  I have a very odd shaped room so I had to create a bulletin board display with lots and lots of hot glue!  My WRITE banner is included in the writers pack, as well as my Writing Tips posters.  

Tips include: 
#1-Think What You Want To Write About
#2- Draw A Picture
#3- Write 3 Sentences About Your Picture
#4- Use 5 Colors In Your Picture
#5- Make 5 Labels For Your Picture
#6- Add Details To Your Writing


At first, I thought it was too many steps.  But, these are steps to add as you go through the year.  For example, in the fall we will work on tips 1-4, but by spring, our goal will be to be able to do all five steps while writing.  And these are great tips to differentiate for those students who have a lot of trouble.  Maybe have them focus on one sentence and picture.


Next, is my writing tools to get the kiddos where they need to be by the end of the year!


I think the very first time we do writers workshop, I always hear, "But I don't know what to write about!!!"  Oh my goodness, child!!  

Well, I will have no more of that this year!  I created these writing topic cards that will stay in a cute little caddy on my writing table.  If I hear a kiddo say those dreadful words, I will silently point towards my writing table.  End. Of. Story.


Here is my storage for daily writing papers and fun extras, like postcards.  My portfolios are on the top, but I plan to keep those in hanging file folders in a cube.


I've included a portfolio cover for each month, that way you can staple it all together and when you are done, put it away to build a year long work sample for your kiddos!

Other parts of this unit include mentor texts that have descriptive lessons + anchor chart labels!  Super excited about this part since my kiddos usually love to create anchor charts!  Here's another pic of some writers workshop awesomeness :)  Just a few pages out of the 125 page unit!  This will definitely get you through the entire school year.


Now, how about a dollar deal???  Grab my Meet The Firsties unit today only for a buck!
I used this last year during the first week of school and I loved how it introduced my new students and built our classroom unity.  

Here's what's included:
"Meet The Firsties" pennant banner
Individual All About Me pennants
Get To Know Your Neighbor Interviews
Firstie Face (draw pic of your neighbor)
First Grade Freckles graph
Eye Color tally graph
Hair Color bar graph
First Grade Quality cards
How We Treat Our Friends writing papers
My Friend List
Firsties In The Future 

Whew!  That's a lot to cover for the first few days of school, so I've made this pack to be used anytime during the year!  Anytime you need to build on relationships, come back to this! :)


Wow guys, that's a lot of good stuff in one blog post.  Make sure you enter to win my Little Writer's Workshop unit below in the rafflecopter and check out the other Dollar Deals from my friends!

Monday is the kick-off for this bad boy:

Come back for more tips and tricks!!!


a Rafflecopter giveaway
An InLinkz Link-up


For my friends at Big Heartland Bloggers with giveaways only, please link up here:


Monday, July 27, 2015

Monday Made-It: Paper Bag Poms!


One thing I love about summer is this linky party!  Fun, fun, fun!!  I can't believe I had time to do it this week, but I whipped one up. :)


My first Monday Made-It is paper bag poms.  I am spending a few hours a week in my classroom, decorating and organizing and this just popped into my head the other day.  I love how burlap tones down the bright colors in a room.  My two main colors are turquoise and lime green.  I just love the brown in the burlap with the other two colors, so instead of making a bright colored tissue paper pom, I decided to try a brown paper bag one!  And it's super easy :)

Supplies:
paper bag (I used one but you can use two to make it fuller)
scissors
stapler
burlap (or you could use tissue paper or other fabric scraps)


1. Cut the bottom of of the paper sack.


2. Cut the edge off of one side.  I used a scallop on mine, but you can do zig zags or small waves.


2. Cut your piece of burlap if you want to add it.  I added scallops like my sack. Then fold it accordion style. This is what will add texture to the sack and make it easier to form a pom.


3. Open the sack and place the burlap in the middle.  There might be a little scrap of the paper bag in there to take out, because you trimmed up the side. Use a stapler to staple the 'sandwich' together.  It should be sack, burlap, sack.  Make sure the middle gets stapled. 


4. Turn the sack sides down so that you can see the burlap.


5. Take a short side of the sack and fold it around to meet the other side, kind of like a flower.  While you are doing this, it's okay to wrinkle and rumple.  That's what makes it look neat!


6.  Once it has formed a pom, staple the bottom so it stays together.  You might want to poof it a bit in the front.


Here it is!  I have added my poms to my Fabric and Burlap Tassel Banner and now my classroom door is adorable!  Love it!


Monday Made-It #2 is a surprise for you guys!  YESSSS, don't you love free stuff??  ;)  I created a new Word Wall with headers for my classroom in turquoise and lime.  It turned out pretty cute.


I am a stickler for laminating everything, sorry about the shine!  


In a few days, all of my TPT Store followers will be sent this pack!  I've included some headers too, just in case you want to use them to write on for another section of your room.  

You can find my TPT store here at Mrs. Baker's Dozen, and score a freebie!!  


I suppose I made the graphic, but this one is more like a TEAM EFFORT!  Bloggers from KS, OK, MO, and AR have come together to form, Big Heartland Bloggers!  This is a new FB group and if you live in these states, look us up!  We will be having a huge BTS giveaway, full of products and tips to share!  So stay tuned :)


Have a wonderful last week of July, my friends!